
A walk-in shower changes how a bathroom feels the moment you step inside. There is no door to pull open, no high tub wall to climb over, and no curtain brushing against your arms. The floor runs in one smooth line, the glass stays out of the way, and the room reads bigger than it is. That openness is the reason walk-in showers show up in so many remodel plans, from tight 5 by 8 ft (1.5 by 2.4 m) guest baths to wide primary suites with room to spare.
The catch is that a walk-in shower is less forgiving than a tub or a standard stall. Water has farther to travel, spray has fewer barriers, and the floor slope, the drain, and the glass all have to work together. Get those details right and the shower feels calm and easy every morning. Get them wrong and you get puddles on the dry floor, cold drafts, and a space that looks good in photos and annoys you in real life. This guide covers both ends of the scale: compact layouts that fit a small bathroom without crowding it, and generous layouts that use extra space well instead of wasting it.
What Counts as a Walk-In Shower
A walk-in shower is a shower you enter without stepping over a tall curb or opening a hinged door. Most designs use one fixed glass panel, or no panel at all, with an open entry. Some have a low curb of 2 to 4 inches (5 to 10 cm) to help hold water back. Others are fully curbless, with the shower floor flush with the bathroom floor. The shared idea is a level, open entry and a floor that slopes to a drain.
That definition matters because it separates walk-in showers from two lookalikes. A standard shower stall has a framed door that swings or slides, and a raised base you step into. A wet room takes the idea further: the whole bathroom floor is waterproofed and drains toward the shower, so the shower has no enclosure at all. A walk-in shower sits between the two. It has a defined shower zone, usually with at least one glass panel, and a bathroom floor that stays dry outside that zone.
Why Homeowners Choose One
The most practical reason is access. No curb, or a very low one, means no step to trip over in the morning and an easier entry for anyone with stiff knees, a bad ankle, or a child in tow. For households planning to stay in the same home for years, that easy entry is a real comfort, not a style flourish. The second reason is visual space. A clear glass panel and a continuous floor make a small bathroom look wider, because the eye travels all the way to the back wall instead of stopping at a shower door frame.
Sizing: How Big Should a Walk-In Shower Be?
Size decides almost everything else: whether the shower feels roomy or cramped, whether one glass panel contains the spray, and whether a bench or a second shower head fits. The code and cost numbers below come from named sources, and the checklist at the end of this article flags which ones are code minimums and which are planning ranges.
Code Minimums and Comfort Minimums
The International Residential Code (IRC P2708.1, as summarized in Sophie House’s 2026 guide to small bathroom walk-in showers) sets the floor for any shower in the United States: at least 900 square inches of interior area, no interior dimension under 30 inches (76 cm), and an entry at least 22 inches (56 cm) wide. A 30 by 30 inch (76 by 76 cm) shower meets that code minimum. It feels tight for most adults, and it leaves almost no margin for spray when there is no door to contain it.
For daily comfort, the National Kitchen and Bath Association (NKBA) recommends a minimum interior size of 36 by 36 inches (91 by 91 cm), according to NKBA guidance cited in TQ Construction’s 2026 walk-in shower guide. That extra 6 inches (15 cm) on each side changes the experience more than the numbers suggest. Elbows stop hitting the wall, turning around feels natural, and a fixed glass panel has a better chance of catching the spray. Treat the NKBA figure as a planning range from a design guide, not a code requirement, and confirm the current code with the local building department before building.
Small Bathroom Layouts That Actually Work

In a small bathroom, the smartest move is usually to reuse the footprint that is already there. The standard bathtub alcove in most American homes measures about 60 inches long and 30 to 32 inches wide (152 by 76 to 81 cm). Turning that alcove into a walk-in shower gives a generous 60 by 30 inch (152 by 76 cm) rectangle without moving the drain or the main plumbing lines. That rectangle is long enough for a bench at one end and a rainfall head at the other, and it is one of the few small-bathroom moves that adds real function without adding square footage.
A corner layout suits square rooms. A 36 by 36 inch (91 by 91 cm) corner shower with a single fixed panel on the open side leaves the rest of the floor clear for the vanity and the toilet. A neo-angle layout trims the front corner at 45 degrees, which frees a few extra inches of floor in front of the vanity in a room where every inch counts. The trade-off is a smaller shower interior and a glass panel that costs more to cut and install than a straight one.
There is a sensory side to a small walk-in shower that photos never show. Step into a well planned one on a cold morning and the warm water hits a space that feels close and sheltering, the steam stays near you instead of drifting across the room, and the glass keeps the rest of the bathroom dry without closing you in. Step into a badly planned one and the opposite happens: the spray escapes through a too-wide opening, the floor outside turns slick, and you end up showering with your shoulders hunched to stay under the water. The difference is rarely the tile. It is the size of the opening, the position of the head, and the slope of the floor.
Planning a compact layout? Our guide to small bathroom ideas shows how a walk-in shower fits a tight floor plan without crowding the vanity and toilet.
If the shower is part of a wider refresh, our modern bathroom ideas roundup covers the finishes and fixtures that pair well with an open shower.
For a calmer, spa-like feel around the shower, see our spa-like bathroom ideas for lighting, materials, and color choices.
Choosing tile for the shower walls and floor? Our bathroom tile ideas guide covers colors, patterns, and layouts that work in wet zones.
Short on storage near the shower? Our bathroom towel storage ideas offer 12 ways to keep towels within reach of the entry.
Remodeling on a budget? Our small bathroom remodel ideas show where to spend and where to save when a shower is part of the project.
Large Bathroom Layouts That Use the Space Well
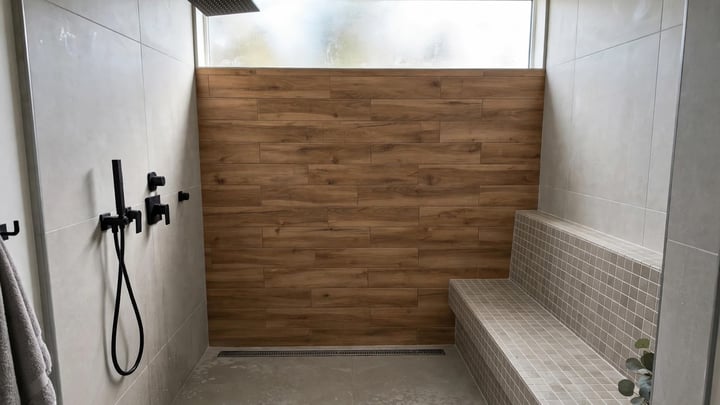
A large bathroom gives the shower room to become a feature instead of a fixture. A 48 by 72 inch (122 by 183 cm) shower fits two shower heads, a bench, and a drying area inside the glass, so nobody has to step onto a cold floor to reach for a towel. A 60 by 60 inch (152 by 152 cm) shower, the size Fixr’s cost guide uses for its custom curbless example, fits a bench, a hand-held head on a slide bar, and clear turning space. At that scale, the shower stops being a corner you squeeze into and becomes a small room of its own.
Large showers invite a different mistake: spreading everything out so far that the space feels empty and drafty. A rainfall head mounted 8 ft (2.4 m) from the bench does not make the shower luxurious. It makes the bather walk across cold tile to get under the water. Keep the working zone compact, even inside a large footprint. Put the bench within arm’s reach of the controls, keep the main head over the standing area, and use the extra length for a dry landing zone or a second head, not for distance between things that belong together.
Light behaves differently in a large walk-in shower, too. Morning sun through a high window can turn the whole wet zone warm and bright, and the steam rises and clears instead of fogging every surface. That openness feels generous on a slow weekend morning, when there is time to stand under the water and let the day start slowly. It only works when the glass is placed to block drafts without blocking the light, and when the floor stays warm underfoot instead of pooling cold water near the drain.
Glass, Panels, and Entries
Glass decides how open the shower feels and how much water stays inside it. The choice is not only about looks. Panel width, height, and placement are the main tools for controlling spray in a doorless design.
Fixed Panels and Open Entries
A single fixed panel is the most common solution in small bathrooms. It stops most spray, has no hinges to maintain, and needs no door swing to plan around. The panel usually runs 30 to 36 inches (76 to 91 cm) wide and 72 to 78 inches (183 to 198 cm) tall, with a gap at the entry side for walking in. In a 60 inch (152 cm) alcove shower, a 36 inch (91 cm) fixed panel with a 24 inch (61 cm) opening gives a comfortable entry and good spray control, as long as the shower head sits on the far wall, away from the opening.
A second panel, set at a right angle to the first, forms an L-shaped entry that blocks more spray while keeping the walk-in feel. It suits larger showers where the opening would otherwise be wide enough for water to escape. A fully open shower with no glass at all works only in a large wet-room style layout with a floor that slopes well and a drain placed to catch water before it reaches the dry floor. In a small bathroom, a glass-free shower is an invitation to mop the floor after every use.
Doors When You Need Them
Some walk-in showers still need a door. A narrow shower under 36 inches (91 cm) wide, a shower head aimed toward the opening, or a household with small children who splash will all push water past a single panel. A hinged door on a walk-in shower needs clear swing space outside the shower, which many small bathrooms do not have. A sliding door or a pivot panel that folds back against the fixed glass saves that swing space and keeps the walk-in entry when the door is left open.
Drainage, Thresholds, and Waterproofing
This is the section that decides whether a walk-in shower works or fails. Tile and glass get the attention, but the floor slope, the drain, and the waterproofing layer underneath do the real work. A beautiful shower with a flat spot in the floor will hold a puddle every single day.
Curbless, Low Curb, and Standard Curb

A curbless shower has no raised threshold at the entry. The bathroom floor transitions smoothly into the shower floor, which makes entry easy and the room look larger. Building one takes more work under the surface: the shower floor has to sit lower than the surrounding floor, or the bathroom floor has to be built up around it, so water flows toward the drain instead of out into the room. That usually means recessing the subfloor between joists, cutting into a slab, or adding a ramped transition. It is a framing decision made at demolition, not a detail that can be added later.
A low curb of 2 inches (5 cm) or less is a practical middle ground. It holds back most stray water, costs far less to build than a fully curbless floor, and still steps over easily. A standard curb of 4 to 6 inches (10 to 15 cm) contains water best and suits showers with a narrow opening or a head aimed toward the entry. The trade-off is a step that some people find awkward, especially at night or with wet feet.
The 2010 ADA Standards for Accessible Design (U.S. Access Board) allow a maximum threshold of 1/2 inch (13 mm) for an accessible shower, with grab bars 33 to 36 inches (84 to 91 cm) above the floor and a clear floor space of 30 by 48 inches (76 by 122 cm) for maneuvering. Those standards apply to public and commercial buildings, not to private homes, so treat them as a tested design reference rather than a legal requirement for a home remodel. A seat height of 17 to 19 inches (43 to 48 cm) from the same standards is a useful planning range for a shower bench.
Linear Drains and Point Drains
A point drain sits in the center of the shower floor and needs the floor to slope toward it from all four sides. That compound slope works well in a square shower and suits small mosaic tile, which bends easily around the slope changes. A linear drain is a long, narrow channel, usually set along one wall or across the entry, that lets the whole shower floor slope in a single direction. That single-plane slope is easier to walk on, easier to tile with large-format tile, and simpler to get right in a curbless shower.
The IRC requires the shower floor to slope toward the drain at no less than 1/4 inch and no more than 1/2 inch per foot (about 2 to 4 percent), according to IRC P2709.1 as summarized in Sophie House’s 2026 guide. That slope sounds small on paper. In practice it is the difference between a floor that dries in minutes and one that holds a thin sheet of water long after the shower ends. A flood test before tiling, where the shower pan is filled with water and left to stand, is the standard way to check the waterproofing layer for leaks. Skipping that test saves a day and risks a leak that shows up months later in the ceiling below.
Waterproofing Mistakes to Avoid
A common mistake is treating tile and grout as the waterproof layer. They are not. Tile and grout slow water down, but water passes through grout over time. The real waterproofing is the membrane or the bonded waterproof board underneath, sealed at every seam, corner, and pipe penetration. If that layer has a gap at the curb, at the drain flange, or where the glass channel meets the floor, water will find it.
Tile, Niches, and Storage
Tile sets the mood of a walk-in shower more than any other finish. It covers the largest surface, it is what your feet and your eyes meet every morning, and it is the hardest thing to change later. Choose it for grip, for cleaning, and for how it looks when wet, not only for how it looks in a showroom sample.
Tile Size, Finish, and Grout
Large-format tile, such as 12 by 24 inch (30 by 61 cm) porcelain, reduces the number of grout lines on the walls and makes a small shower look calmer and less busy. It needs a flat wall and a skilled installer, and it suits a linear drain with a single-plane floor slope. Small mosaic tile, usually 2 by 2 inches (5 by 5 cm) or smaller, follows curves and compound slopes easily and gives the floor natural grip from its many grout lines. It suits a point drain and a shower floor that slopes from four sides.
Finish matters underfoot. Polished tile looks sleek and reflects light, but it turns slippery when wet and soapy. Matte or textured tile grips better and hides water spots. On the walls, a matte finish shows fewer streaks and feels softer to the eye, while a glossy finish bounces light around a dark bathroom and wipes clean easily. Many showers mix the two: glossy tile on the walls for light, matte mosaic on the floor for grip.
Niches, Shelves, and Benches
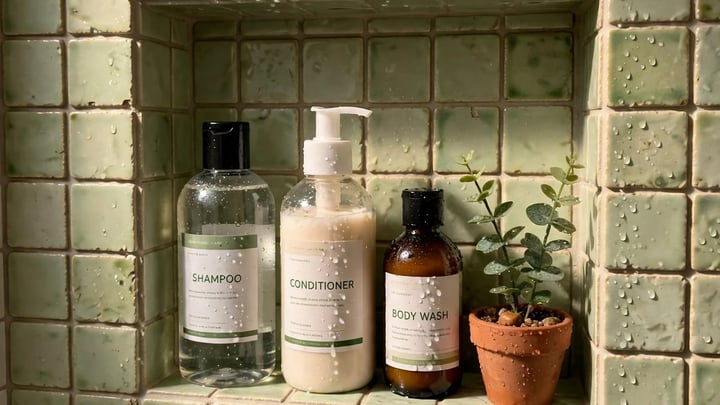
A recessed niche beats a shower caddy in almost every walk-in shower. It holds shampoo and soap at arm height, it does not rust or fall off the wall, and it keeps bottles out of the spray line so they do not get knocked over. A standard niche of about 12 by 24 inches (30 by 61 cm) fits tall bottles with room to spare. Place it on a side wall, not on the wall with the shower head, so bottles stay out of the direct stream. In a small shower, one niche is enough. In a large shower shared by two people, two niches, one per side, stop the daily shuffle of bottles.
A bench turns a shower from a quick rinse into a place to sit, shave legs, or rest while the hot water runs. A built-in tiled bench of about 17 to 19 inches (43 to 48 cm) high, using the ADA seat height range as a planning reference, suits most adults. A teak bench adds warmth and can be removed for cleaning, but it needs oiling to keep its color. A floating bench, supported by brackets instead of a solid base, leaves the floor clear underneath and makes the shower look lighter, though it holds less weight than a fully built-in seat. In a shower under 48 inches (122 cm) long, a small corner seat or a fold-down teak seat saves space better than a full bench.
Shower Heads and Controls
Fixtures decide how the water feels, and their placement decides whether the shower is pleasant or awkward. A beautiful shower head in the wrong spot is worse than a plain one in the right spot.
One Head, Two Heads, or a Hand-Held
A single overhead rainfall head gives a soft, even wash and suits a calm, spa-like shower. It needs enough height to clear tall users and enough water pressure to feel full rather than drizzly. A standard wall-mounted head on an adjustable arm is more flexible: it aims where the bather stands, and it works in showers with lower ceilings. Many walk-in showers pair one fixed head with a hand-held head on a slide bar. The hand-held rinses hair, cleans the shower walls, washes children or pets, and helps anyone who sits on the bench. That versatility makes it the single most useful fixture in a shared or accessible shower.
Place the controls where they can be reached without stepping under the water. That usually means on the wall beside the entry, or on the side wall within arm’s reach of the opening. Reaching through a stream of cold water to turn the shower on is a small daily frustration that a good layout avoids entirely. A thermostatic mixing valve, which holds the water temperature steady when a toilet flushes or a tap opens elsewhere, is worth the extra cost in a household with more than one bathroom.
What a Walk-In Shower Costs
Cost is where walk-in shower plans meet reality, and the range is wide because the scope varies so much. A prefab shower unit swapped into an existing alcove costs far less than a custom curbless shower with a linear drain, a bench, and frameless glass. Any single average hides that spread, so read the ranges below as planning context, not as a quote.
Fixr’s walk-in shower cost guide, updated March 4, 2025, puts the typical project at $5,000 to $11,000, with an $8,000 average. The same guide puts a custom 60 by 60 inch (152 by 152 cm) curbless shower with a seat, grab bars, tiled walls and floor, and a hand-held head on a slide bar at $20,000 or more. This Old House’s 2026 shower remodel guide, based on Homewyse cost data and a 2026 survey of 1,000 homeowners, puts a custom walk-in shower at $8,500 to $10,000 or more, with tile, waterproofing, and frameless glass as the main cost drivers. The two sources differ because they measure different scopes and different markets, which is normal for remodeling costs. Prices vary by region and material, and labor is often the largest share.
Where the Money Goes
Waterproofing and tile labor usually cost more than the tile itself. A curbless floor adds framing and subfloor work before any finish goes on. Frameless glass costs more than framed glass, and a custom-cut panel costs more than a standard size. A linear drain costs more than a point drain, both for the drain itself and for the single-plane floor it needs. A bench, a niche, and a second shower head each add labor and materials, and each one is cheaper to add during the remodel than to add later.
Style Ideas for Small and Large Bathrooms
A walk-in shower can fit almost any bathroom style, as long as the style follows the practical decisions instead of fighting them. The tile, the glass, and the fixtures carry the look. The drain and the slope carry the function.
Small Bathroom Style Ideas
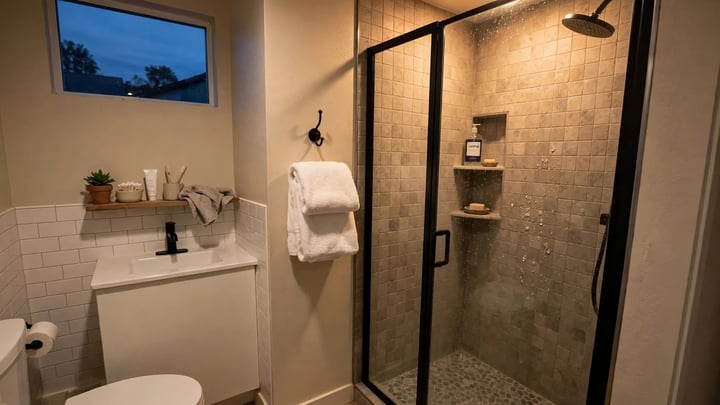
In a small bathroom, light colors and large tiles make the shower read as part of the room instead of a separate box. Running the same floor tile from the bathroom into the shower, with no curb and no change in material, stretches the floor visually and makes the room feel wider. A clear glass panel keeps that sightline open. A single accent, such as a darker tile in the niche or a matte black shower head against pale tile, gives the shower character without chopping the small space into competing pieces.
Large Bathroom Style Ideas
A large bathroom can carry a bolder shower without crowding the room. A full-height accent wall in handmade-look tile, a dark green or charcoal tile on the back wall, or a wood-look porcelain bench can give the shower a clear identity. A double shower with two heads and a bench reads as a deliberate feature in a primary suite, not as empty space. A window inside the shower, with privacy glass and a sill that slopes so water runs off, brings in daylight and makes the shower feel connected to the outdoors.
The feeling of a large walk-in shower on a quiet morning is hard to describe without sounding sentimental, and it is the reason many people remodel in the first place. Warm water, steam rising into a bright space, stone underfoot that slowly warms as the shower runs, and no door to open or close. There is nothing to rush past. That calm is the point of the extra space, and it disappears when the shower is filled with fixtures that nobody uses or a bench placed where nobody sits.
Conclusion
A walk-in shower works best when the practical decisions come first and the style follows them. Size the shower for the people who use it, not for the photo. Put the head away from the opening, slope the floor to a drain that suits the tile, and waterproof everything underneath. Choose glass that contains the spray without closing off the light, add storage where hands actually reach, and spend the budget on the layers that touch water before spending it on finishes.
Small bathrooms gain the most from a walk-in shower, because the open entry and the continuous floor make a tight room feel larger. Large bathrooms gain a different reward: a shower with room to sit, room to breathe, and room for the morning to slow down. Either way, the shower earns its place by working quietly every day, with dry floors outside, warm water inside, and nothing to trip over in between.




Leave a Reply
You must be logged in to post a comment.