
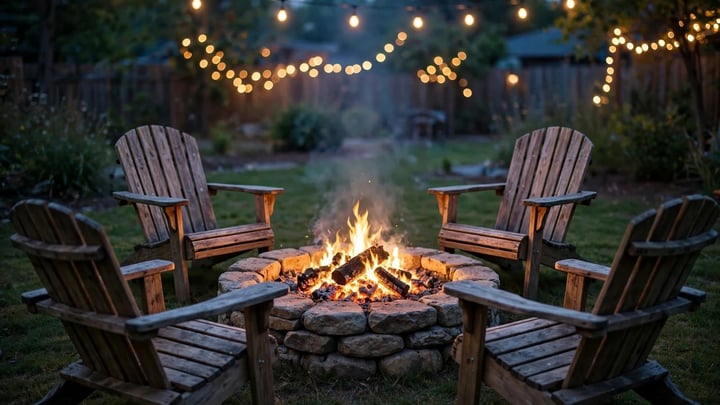
A garden changes character after sunset. Paths disappear, planting turns into dark shapes, and a seating area that felt inviting at noon can feel cold and unusable by nine in the evening. Garden lighting fixes that gap. It marks where to walk, shows off the plants and structures worth looking at, and gives an evening outdoors the warm, relaxed feeling that makes people stay outside longer.
The best garden lighting is rarely one bright fixture. It is a set of small, warm lights at different heights, each doing one clear job. This guide explains how to layer those lights, how to choose between solar and low-voltage systems, how bright each area should be, and how to keep the result safe, neighbor friendly, and kind to wildlife.
Key Takeaways
- Layer three kinds of light: soft ambient light for seating areas, task light for paths and steps, and accent light for trees, plants, and focal points.
- Warm white light at 2700K to 3000K suits most gardens. Cooler light looks harsh outdoors and belongs mainly on security fixtures.
- Path lights need far less brightness than most people expect. GardenUK puts path markers at 50 to 100 lumens and spotlights on trees at 300 to 600 lumens.
- Solar suits sunny paths and seasonal accents. Low-voltage systems suit lights used every night and anything that needs steady brightness.
- Shield fixtures downward, keep light off neighboring windows, and check local rules before digging cable or adding a new outdoor circuit.
How Garden Lighting Works After Dark
The Three Layers That Make a Garden Feel Magical
Think of garden lighting in three layers. Ambient light sets the general mood. It comes from string lights over a seating area, lanterns on a table, or low wall lights that wash a fence with a soft glow. Task light does a practical job. It marks paths, steps, and changes in level so nobody trips. Accent light picks out one feature at a time: a tree, a large shrub, a stone wall, a water feature, or a piece of garden art.
Most disappointing gardens use only one layer. A single bright floodlight over a patio gives plenty of light and no atmosphere. A garden with string lights alone looks pretty in photographs and leaves the path to the back gate in darkness. The Checkatrade outdoor lighting guide makes the same point: lighting should cover ambience, safety, and the features worth highlighting, rather than treating one bright fixture as a complete plan.
Start by deciding which layer is missing in your garden. Walk outside after dark with the house lights off. Note where you hesitate, where you cannot see a step, and which plant or structure still looks good as a silhouette. Those observations become the lighting plan. A plan built from a real evening walk beats a plan built from a catalog, because it follows how the garden is actually used.
If the wider garden layout still needs work before you add lights, our guide to modern garden design ideas covers paths, planting beds, and structure first.
Lighting a compact plot? Our small garden ideas show how planting, paths, and focal points fit into a tight space.
Where to Begin: Walk the Garden at Dusk
Dusk is the best time to plan. The shapes are still visible, and the first dark corners show themselves. Carry a flashlight and hold it low at path height, then at waist height, then above a shrub. Low light shows the ground. Higher light shows faces and seating. Light from below shows the shape of a tree. Each position suggests a different fixture.
Mark three kinds of spots. First, every place where footing changes: steps, a slope, the edge of a deck, and the turn from a lawn onto a path. Second, every place where people sit, eat, or cook outdoors. Third, one or two features that deserve attention after dark. A garden with three focal points looks richer than a garden with ten, because the eye has somewhere to rest and the dark areas between features keep their mystery.
For a 10 by 12 foot patio (3.0 by 3.7 m), one overhead string of lights plus two low lanterns on the table usually gives enough ambient light for dinner. For a 30 foot path (9.1 m), a row of low path lights on one side marks the route without turning the walk into a runway. These are illustrative examples for planning, and the exact count depends on the brightness of each fixture and how much light spills from the house.
Path and Step Lights: Safety First, Style Second

Path lights should sit low and point down. A fixture 18 to 24 inches tall (46 to 61 cm) with a hooded top throws a pool of light onto the ground and keeps the bulb out of direct view. That matters more than it sounds. A bare bulb at eye level forces the eye to adjust, and the path beyond it looks darker by contrast.
Spacing depends on brightness and beam spread, so treat any spacing number as a starting point to test at night. A common planning approach is to stagger fixtures on alternate sides of a path, about 6 to 8 feet apart (1.8 to 2.4 m), then adjust after a night trial. Staggering looks more natural than a straight line of identical lights on both sides, and it uses fewer fixtures. Place the first light where the path leaves the patio or door, and the last one where the path ends, so the route reads as a complete line.
That hesitation is the feeling to design against. Most people know it well, the short pause at the top of a step, the careful shuffle across a dark lawn. A low pool of warm light underfoot takes that tension away. Feet find the step edge without thinking, and the walk to the gate feels easy instead of watchful.
GardenUK gives a useful brightness frame for this job: path markers at 50 to 100 lumens, step lights at 30 to 50 lumens, and patio glow at 100 to 300 lumens. Those numbers are lower than many shoppers expect. GardenUK adds the warning that if path lights are bright enough to read a book by, they are too strong. That is a practical test anyone can use at night.
Steps need light on the tread, rather than light shining into the eyes of the person climbing. Recessed lights set into a riser, or small fixtures tucked under a step nosing, do this well. Rope lights under a deck edge work the same way, as Checkatrade notes in its guide to decking and step lighting. The fixture stays hidden during the day, and the glow appears only where footing matters. On a deck, low lights along the outer edge mark the boundary between deck and lawn, a boundary that is easy to miss after dark.
String Lights and Festoon Lights: The Fastest Way to a Magical Feeling

String lights are the quickest way to change how a garden feels at night. One strand over a seating area creates a ceiling of warm points of light, and the garden below it feels like a room. Checkatrade calls festoon lights an instantly cozy, party ready choice, and the Bulb Barn guide agrees that draped string lights work well over patios and in smaller areas where a single strand can transform a plain space.
Hang string lights with a gentle sag between supports, rather than pulling them tight. A sag of 12 to 18 inches (30 to 46 cm) over a 10 foot span (3.0 m) looks relaxed. Anchor the ends to a house wall, a pergola beam, a fence post, or a freestanding pole, and keep the strand at least 7 feet (2.1 m) over a walkway.
Frosted bulbs give a softer glow than clear bulbs. Bulb Barn notes that clear bulbs can feel harsh, while frosted bulbs cast a more diffused light suited to quiet evenings. Clear bulbs suit a festive party look. Frosted bulbs suit regular evening use. If the strand will stay up all season, frosted warm white is the safer default.
One or two strands usually beat four or five. A common mistake is covering every fence, tree, and pergola beam with lights until the garden looks like a fairground. Restraint keeps the string lights special. Let the dark parts of the garden stay dark, and let one lit area carry the evening. Keep the strand above head height, at least 7 feet (2.1 m) over a walkway, so nobody catches it.
Spotlights and Uplighting: Showing Off Trees, Plants, and Walls
Uplighting a Tree the Right Way

Uplighting turns an ordinary tree into the centerpiece of an evening garden. Place a spotlight at the base, a short distance from the trunk, and aim it up through the branches. MyGardenInspo describes a single ground spotlight under an olive tree as enough to make that tree the evening centerpiece while the lawn around it stays dark. That contrast is the point. The dark lawn makes the lit tree look taller and more dramatic.
Aim matters. A light placed too close to the trunk throws a narrow beam up one side and leaves the canopy dark. A light placed too far away spreads the beam and loses drama. Start about 2 to 3 feet (0.6 to 0.9 m) from the trunk for a small tree, farther for a large one, and adjust the angle at night. A spike spotlight is easy to move, so test two or three positions before fixing it in place.
Choose one tree per view. A garden with one uplit tree, seen from the patio and from the kitchen window, looks intentional. The best candidate is a tree with an interesting shape, such as a multi stem Japanese maple or a mature tree with textured bark.
Washing Walls, Fences, and Hedges
Wall washing is a softer form of accent light. A fixture placed a short distance from a wall throws a wide, even wash across brick, stone, or timber. It shows texture without creating a hard spotlight. This suits a garden wall, a fence with climbing plants, or a hedge with a strong shape.
For planting, aim the light from the front and slightly to one side, rather than straight on. Side light creates shadows between leaves and shows depth, while front light flattens a shrub. Backlighting works for ornamental grasses, where a light behind the clump makes the seed heads glow.
Plant choice still follows the garden, rather than the lighting plan. Check the USDA hardiness zone before adding a plant to a lit border. Ornamental grasses need a separate check: Miscanthus and Pennisetum can become invasive in some parts of the United States, so check the local invasive plant list and prefer sterile cultivars or native grasses where that risk applies.
Lanterns, Candles, and Portable Light

Lanterns are the most flexible garden light. They move from table to path to steps, they need no wiring, and they look good in daylight as objects. A cluster of three lanterns in different heights on a table reads as a centerpiece. A single lantern at the top of a step marks a hazard. A row of lanterns along a low wall defines a seating area without any installation.
Lantern light has a different quality from fixed fixtures. It glows softly, warms the faces around the table, and makes an ordinary evening feel unhurried. People linger longer when the light feels close and gentle. A lantern still glowing while plates are cleared is often what turns a quick dinner outside into a long evening.
Battery lanterns with LED candles give steady light and no fire risk. Real candles give a flicker that LEDs still struggle to match, but they need a sheltered spot and a stable base. Keep any open flame away from dry leaves, fabric cushions, and low branches, and never leave it burning unattended.
Solar lanterns charge during the day and switch on at dusk. They suit a table or shelf that gets direct sun. A lantern under a tree canopy or on a shaded north facing wall will charge poorly and fade early.
Solar vs Low-Voltage vs Battery: Which System Fits Your Garden

This is the decision most top ranking articles handle thinly. They list the options and move on. The choice matters because it decides brightness, reliability, and how much work the installation needs.
Solar lights charge from a panel during the day and run from a battery at night. They need no wiring, no transformer, and no electrician. That makes them the easiest system to install and the easiest to move. Their limits are brightness and consistency. Claddix, in a comparison of solar and low-voltage systems, puts solar fixtures at 5 to 100 lumens per fixture and low-voltage fixtures at 50 to 600 lumens or more. GardenGear gives a similar picture: solar path lights typically reach 10 to 50 lumens, while wired spotlights reach 300 to 1,500 lumens. A solar path light marks a route. It does not light a large yard or provide security lighting.
Low-voltage systems run at 12 volts from a transformer plugged into a standard outdoor outlet. The transformer steps household current down to 12 volts, and a buried cable carries that low voltage to each fixture. The light is steady in any weather, the fixtures are brighter, and the choice of fixture types is wider: path lights, spotlights, well lights, wash lights, and hardscape lights. The trade off is installation. Cable needs burying, the transformer needs sizing for the total wattage, and the layout needs planning before the first trench is dug.
| System | Typical brightness per fixture | Best for | Main limit |
|---|---|---|---|
| Solar | 5 to 100 lumens (Claddix) | Sunny paths, accents, seasonal light | Fades in shade and winter; dimmer output |
| Low-voltage LED | 50 to 600 lumens or more (Claddix) | Nightly use, uplighting, security areas | Needs transformer, cable, and planning |
| Battery | Low to moderate | Parties, shaded spots, temporary displays | Short runtime; needs recharging or new batteries |
| Line-voltage (120V) | 600 to 1,200 lumens or more (YardCost) | Bright security and large areas | Needs an electrician, conduit, and permits in many places |
Where this usually goes wrong is buying a full set of solar lights for a shaded garden, then finding they fade by ten in the evening. Check the sun first. A path that gets six hours of direct sun suits solar. A path under a tree canopy, on the north side of a house, or in a region with short winter days suits low-voltage. GardenGear notes that in the Pacific Northwest, solar lights may run only 3 to 4 hours on a partial winter charge.
The disappointment is easy to picture. Dinner moves outside on a warm evening, the lights glow for an hour, then fade one by one until the table sits in darkness and everyone drifts back indoors. A garden that goes dark at ten feels unfinished. Steady light lets the evening stretch, and nobody needs a phone torch to find the way back to the door.
Color Temperature and Brightness: Warm Light Wins Outdoors
Color temperature, measured in Kelvin (K), describes whether white light looks warm and amber or cool and blue. Lower numbers are warmer. Candlelight sits near 1800K, a traditional incandescent bulb near 2700K, and daylight near 5500K. For a garden, that number matters more than the wattage, because it decides whether the space feels like a home or a car park.
Warm white at 2700K to 3000K is the standard choice for gardens, patios, and entrances. Checkatrade states that warm white at 2700K to 3000K creates a cozier feel than cool white, which can look clinical outdoors. Bloiq gives the same range and adds that dark sky organizations recommend warm light, generally 3000K or lower, because blue rich light scatters more in the night sky and affects insects, birds, and other wildlife more. The re-design guide for landscape lighting color temperature reaches the same conclusion: 2700K to 3000K flatters brick, wood, and foliage, while anything above 3500K starts to look clinical in a garden setting.
The difference shows on faces and food. Warm light makes skin look healthy and a plate of food look appetizing, so people relax and stay at the table. Cool blue light does the opposite. It sharpens every shadow, makes eyes squint, and gives the garden a cold, clinical edge that sends people inside even on a mild night. Most people feel that shift without naming it.
Cooler light has a narrow place. Neutral white at 3500K to 4000K gives crisper visibility on a driveway, and cool white at 4000K to 5000K suits a security floodlight. Keep those fixtures away from seating areas and on a sensor or timer.
Brightness follows the same logic. Less light, placed well, beats more light placed badly. GardenUK gives the clearest frame: path markers 50 to 100 lumens, step lights 30 to 50 lumens, patio glow 100 to 300 lumens, spotlights on trees or walls 300 to 600 lumens, and a front door or porch 300 to 600 lumens. Bloiq gives a similar frame: path and step lights in the tens of lumens up to about 100 to 200, accent and spot lights about 100 to 400, and porch lights about 400 to 800. The two guides disagree on exact numbers, which is a useful reminder that lumens are a guide to shopping, rather than a building code. Use the lower end of the range first, test at night, and add light only where the garden still feels unsafe or flat.
Safety, Weather Ratings, and Local Rules
Outdoor lighting lives in rain, sprinklers, frost, and summer heat. The IP rating on a fixture describes how well it resists dust and water. Bloiq explains the code in plain terms: IP44 protects against splashing water and suits a sheltered spot under a porch roof, IP65 is dust tight and protected against water jets and suits a fully exposed garden, and IP67 withstands temporary immersion and suits ground level lights where puddles form. For most garden fixtures, IP65 is a sensible minimum for exposed positions. Check the rating before buying, rather than after the first heavy rain.
Low-voltage systems are safer to handle than line-voltage systems, because the cable carries 12 volts rather than 120 volts. That does not make them risk free. Connections still need to stay dry, cable still needs burying or protecting where people walk or dig, and the transformer still needs an outdoor outlet with proper protection. Bloiq notes that new outdoor circuits, junction boxes, and buried cables must meet local electrical codes, often need RCD or GFCI protection, and in many places must be installed or inspected by a qualified electrician. Local code varies, and the exact permit and inspection rules for your area are items to verify with your local authority or a licensed electrician before work starts. Do not treat a general guide as a substitute for that check.
Being a Good Neighbor: Glare, Light Trespass, and Wildlife
Garden lighting does not stop at the property line. A bright, unshielded fixture shines into a neighbor window, into the street, and into the sky. That light is wasted, and it creates the glare that makes it harder to see, rather than easier. Bloiq warns that very bright lights create harsh shadows and glare that make it harder to see and annoy neighbors. The fix is simple: point light down, shield the bulb from view, and use only as much brightness as the job needs.
Glare ruins a quiet evening in a very direct way. A bare bulb in your line of sight makes your eyes water, washes out the planting you meant to enjoy, and turns a calm garden into a place you want to leave. The same light through a bedroom window can keep a neighbor awake. Shielded, downward light keeps the warmth where people sit and leaves the rest of the night alone.
DarkSky International, the organization behind the Five Principles for Responsible Outdoor Lighting, recommends warm colored light at 3000K or lower, fully shielded fixtures that direct light downward, and controls such as timers and dimmers. Its Fixture Seal of Approval program requires a color temperature of 3000K or lower and a U0 uplight rating, which means no direct light above the horizontal plane. The Lumens guide to dark sky compliance summarizes the same standard: fully shielded, downward directed, no brighter than necessary, warm colored, and controlled by a dimmer, timer, or motion sensor.
Wildlife is part of the same picture. The American Medical Association issued guidance in 2016 recommending outdoor lighting no higher than 3000K, as summarized by DarkSkiesAtlas. A 2022 study from the University of North Carolina, cited by the Birmingham Control Centre guide, found that bugs swarm cool white LEDs far more than yellow toned ones.
Check local rules before installing floodlights. Bloiq notes that some municipalities have lighting bylaws limiting glare and light trespass. A quick check with the local planning office saves a dispute with a neighbor and a costly reinstallation.
What Garden Lighting Costs
Cost is the question most top ranking garden lighting articles skip or answer with a single vague range. Angi gives a clearer 2026 frame, updated in October 2026. Its national average cost to install landscape lighting is 3,500 dollars, with most homeowners spending 2,000 to 6,000 dollars depending on the number of fixtures, system complexity, and site conditions. Per fixture, Angi puts pathway lighting at 100 to 250 dollars, spotlights at 150 to 350 dollars, floodlights at 200 to 500 dollars, LED fixtures at 150 to 500 dollars, and solar fixtures at 50 to 200 dollars. Labor runs 50 to 100 dollars per hour, and Angi puts a DIY installation at 500 to 3,150 dollars and a professional installation at 1,650 to 6,800 dollars in total.
Those are installed prices, and they vary by region and material. A small DIY project looks very different: a solar path light set, a single string light, and two battery lanterns can light a small seating area and a short path for a modest outlay, with no labor cost at all. Price the plan in two parts, fixtures first, then installation, and test it with a few temporary lights before committing to trenching and a transformer.
Small Gardens, Patios, and a First Plan
A small garden needs fewer lights, and that is an advantage. One string light over a seating area, two path lights, and one uplight on a shrub or small tree can make a compact garden feel complete. The Bulb Barn guide notes that one or two strands of string lights can be more effective than many, especially in a smaller area. Balconies suit portable light: battery lanterns, a short string light, and a solar stake in a planter give evening light with no drilling and no wiring.
Compact gardens have a closeness that a large one cannot copy. The light stays near, the scent of warm wood and evening flowers hangs in the air, and the whole space feels like a small room with the sky for a ceiling. That intimacy is the reward for restraint. A few warm lights, placed low and close, make the garden feel snug and inviting.
A first plan needs only three parts: the route from the door to the seating area, the seating area itself, and one feature worth looking at. Test before committing. Lay fixtures on the ground at night and live with the layout for a few evenings. Moving a spike light takes a minute, while moving a buried cable takes an afternoon.
Mistakes to Avoid
The trap here is buying the brightest fixtures available and lighting the garden like a sports field. Bright light flattens planting, creates harsh shadows, and makes the seating area feel exposed. Start dim, test at night, and add light only where it is needed.
Mixing color temperatures across the garden creates a second common error. A warm string light at 2700K next to a cool white security light at 5000K makes both look wrong, and the garden feels patched together. Pick one warm temperature for the garden lights, keep cooler light for security fixtures on a sensor, and check the Kelvin number on every box before buying.
Another error is lighting everything at the same height. A garden lit only from the ground looks bottom heavy. A garden lit only from above looks flat. Mix heights: low path lights, table lanterns at waist height, string lights overhead, and one uplight on a tree. That mix is what creates depth.
A further error is forgetting the view from inside the house. A garden is often seen through a window before it is used outdoors. A bare bulb visible from the kitchen window creates glare indoors. A shielded fixture, aimed down or at a plant, looks good from both sides of the glass. Check the view from the main indoor seating spots, as well as from the garden itself.
Conclusion
Garden lighting works when it follows how the garden is used after dark. Mark the path, light the seating area warmly, pick one feature to show off, and leave the rest in soft darkness. Choose solar where sun is plentiful and the job is simple. Choose low-voltage where steady brightness matters every night. Keep the color warm, the brightness low, and the fixtures shielded and pointed down. Test the layout at night before burying cable, and add lights one zone at a time. A garden lit that way does not need to be large or expensive to feel magical. It needs to be planned, warm, and quiet enough for an evening outdoors to feel like a rest, rather than a display.
For the seating area the lights will serve, our patio design ideas treat the patio as an outdoor living room.
Planning the whole backyard on a tight budget? Our backyard ideas on a budget cover low-cost changes that pair well with a small lighting plan.
If the lit area includes a cooking spot, our outdoor kitchen ideas cover layout and materials for cooking outside.
For festive string lights in winter, our outdoor Christmas decoration ideas show how seasonal lighting fits a garden.
Choosing plants to uplight? Our indoor plants guide is about houseplants, and its placement advice helps you think about light needs before picking a feature plant.
For a holiday version of the same warm glow, see our minimalist Christmas decor ideas for restrained seasonal lighting indoors.



Leave a Reply
You must be logged in to post a comment.